Setting up transparent Tor proxying on Linux
TLDR: Tutorial to set up a Linux machine that routes all traffic through Tor by default, similar to how Whonix's gateway works. Useful for client-side use, server-side use, and VMs hosted on the machine.
(If you want to jump straight to the tutorial, click here)
(Certain steps of this guide are very verbose. It is recommended to download this
guide as an offline PDF document using Ctrl+P and transferring it to the concerned
machine, in case you choose not to use the provided scripts.)
Need for proxying all internet traffic through Tor
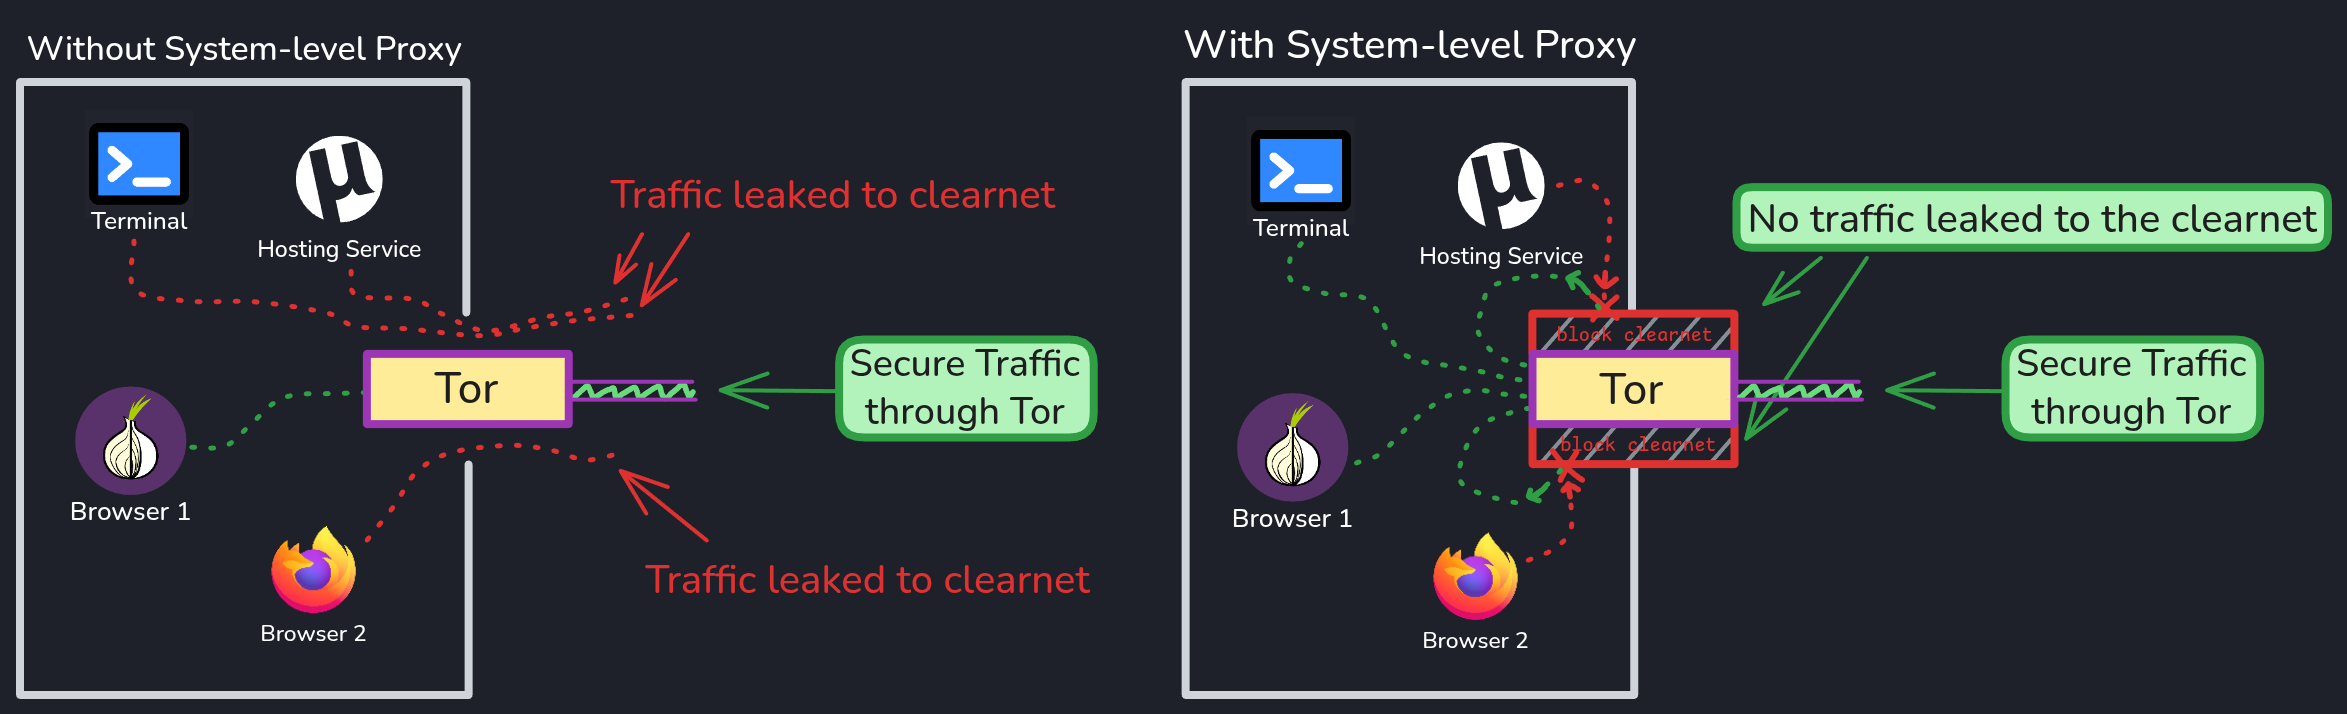
The problem with relying on individual applications to proxy their internet traffic through Tor is that many applications either don't support proxy configuration at all, ignore proxy settings, or leak your real IP address through DNS queries or other side channels. This results in metadata and general internet traffic being unintentionally leaked to the clearnet.
Why we can't trust applications to handle the proxying
When you manually configure only specific applications (like Firefox, or Librewolf) to use Tor, other applications on your system (email clients, chat apps, system updates, etc.) continue to communicate directly with the internet using your real IP address. Even applications that may support proxy settings can have features that bypass the configured proxy or fail to properly tunnel DNS queries, revealing your true identity to the services you're connecting to.
If proxy settings are misconfigured, app and app updates can silently disable proxy settings, often without your knowledge. A user might believe they're anonymous when they're actually completely exposed.
DNS leaks and side-channel exposure
Even if application traffic is successfully proxied, DNS queries from those
applications may still leak your real IP address to your ISP and DNS providers.
When your browser queries a domain name (like evil.google.com), the resolver needs
to know which server to connect to. If that DNS query isn't routed through Tor, the
resolver knows your real identity and can log which sites you're attempting to visit.
This happens outside most users' awareness.
Why proxy your computer's entire network
A proxy at the system level intercepts all outgoing traffic before applications even know it's being proxied. Applications cannot opt out, misconfigure it, or leak around it because your entire internet is automatically redirected through the Tor network. This creates a security boundary that applications cannot bypass through misconfiguration or exploits.
Few things to consider
- Although illustrated mainly on Debian Linux, most of this tutorial will work with
any common Linux distribution that features the following:
- systemd init system
- Package manager with 'tor' and 'nftables' available
- text editor If you do not know what any of these things mean, ignore them. As long as you are on Debian or Arch, the tutorial will work.
The script (quick-systor.sh) supports Debian-based distros (apt)
and Arch-based distros (pacman). Both use systemd.
For OpenRC systems (Devuan, Artix), use quick-systor-openrc.sh instead.
Tutorial
Throughout this guide the following definitions will be used: 1. Lockdown mode: System's and its services' internet access is blocked completely. 2. Transparent Proxy: The system Tor proxy that routes all internet traffic through tor. 3. Stop gate: The confirmation prompt and action required to stop or disable the firewall.
Prerequisites
- Root/sudo access on a Linux machine (preferably Debian 13)
- Basic Linux knowledge
- Text editor (nano, vim, etc.) navigation
Step 1: Install Tor Package
# Debian (apt)
user@debian:~$ sudo apt update
user@debian:~$ sudo apt install tor

# Archlinux (pacman)
user@archlinux:~\$ sudo pacman -S tor

# For OpenRC-based systems (Artix)
user@artix:~\$ sudo pacman -S tor-openrc
user@debian:~$ tor --version
Tor version 0.4.9.11. # Can be different
This build of Tor is covered by the GNU General Public License (https://www.gnu.org/licenses/gpl-3.0.en.html)
Tor is running on Linux with Libevent 2.1.12-stable, OpenSSL 3.5.6, Zlib 1.3.1, Liblzma 5.8.1, Libzstd 1.5.7 and Glibc 2.41 as libc.
Tor compiled with GCC version 14.2.0
Setting up system proxy
Step 2: Install via the helper script (recommended)
The script auto-detects your interface, Tor user, sshd port, and hostile/home
mode. It writes three configs, installs the gate + watchdog + proxy unit,
locks configs immutable (chattr +i), and enables the proxy.
2.1 What the install creates
Run scripts/quick-systor.sh
or scripts/quick-systor-openrc.sh:
# Quick System Tor setup script (configures everything that's required)

# If you're not using OpenRC
user@debian:~$ curl --socks5 127.0.0.1:9050 -fsSL \
>   http://opbible7nans45sg33cbyeiwqmlp5fu7lklu6jd6f3mivrjeqadco5yd.onion/opsec/proxying-linux-through-tor/scripts/quick-systor.sh \
>   -o quick-systor.sh
user@debian:~$ sudo chmod +x quick-systor.sh
user@debian:~$ sudo bash quick-systor.sh

# If you're using OpenRC
user@devuan:~$ curl --socks5 127.0.0.1:9050 -fsSL \
>   http://opbible7nans45sg33cbyeiwqmlp5fu7lklu6jd6f3mivrjeqadco5yd.onion/opsec/proxying-linux-through-tor/scripts/quick-systor-openrc.sh \
>   -o quick-systor-openrc.sh
user@devuan:~$ sudo chmod +x quick-systor-openrc.sh
user@devuan:~$ sudo bash quick-systor-openrc.sh
| File | Purpose |
|---|---|
/etc/nftables-tor.conf |
Tor redirect rules. Immutable. |
/etc/nftables.conf |
Clearnet flush (flush ruleset). Loaded by nftables.service at boot. Immutable. |
/etc/nftables-stop.conf |
Lockdown mode. Loaded by the gate on an unconfirmed stop. Immutable. |
/etc/systemd/system/tor-transparent-proxy.service |
The proxy service. |
/etc/systemd/system/tor-wall-watchdog.{service,timer} |
Reapplies Tor rules if anything removes them. |
/usr/local/sbin/tor-transparent-proxy |
start/stop/status helper. |
/usr/local/sbin/tor-firewall-gate |
10 second confirmation gate when one tries to disable firewall. |
/usr/local/bin/tor-firewall-confirm |
Gate helper. |
When the firewall or proxy is stopped, tor service doesn't stop. You can still use it.
If you want to undo the script's actions, or you've misconfigured something, see this.
2.2 Toggling the proxy
The proxy can be disabled from systemctl, and it persists across reboots. Tor keeps running.
# Stop routing internet through Tor and disable the routing at boot
user@debian:~$ sudo systemctl disable --now tor-transparent-proxy.service
user@debian:~$ sudo tor-firewall-confirm
If the confirmation is approved though, within 10 seconds all traffic is unproxied
and directed through clearnet. The disable removes the boot symlink, so a reboot
also stays clearnet.
# Re-enable the transparent proxy (route through Tor again, at boot and now)
user@debian:~$ sudo systemctl enable --now tor-transparent-proxy.service

# Check state
user@debian:~$ systemctl is-active tor-transparent-proxy.service   # active | inactive
user@debian:~$ systemctl is-active tor-wall-watchdog.timer         # active while proxy is on
user@debian:~$ curl https://check.torproject.org/api/ip            # IsTor:true when on
The Tor service is not touched by any of the above.
systemctl status tor@defaultstaysactive (running)throughout.
2.3 Boot behavior
At boot, when the proxy is enabled, the firewall and its configs are loaded before the system gets any internet access. When the proxy is disabled, all traffic is unproxied and is routed through clearnet. Tor's always listening in either cases.
\
Learn more about the helper script here.
Step 3: Manual configuration
If you choose not to use the helper script, or you want to see what it does right here, this is the manual configuration.
You can skip this step if you've used the helper script.
3.1: Firewall Setup
Firewall Setup (click to expand)
Create or overwrite `/etc/nftables-tor.conf`:user@debian:~$ sudo nano /etc/nftables-tor.conf
#!/usr/sbin/nft -f

flush ruleset

define TOR_UID = 110          # Verify with: id -u debian-tor
define TRANS_PORT = 9040
define DNS_PORT = 5353
define VIRT_ADDR = 10.192.0.0/10
define SSHD_PORT = 22         # Match your sshd_config Port

table inet filter {
    set NON_TOR {
        type ipv4_addr
        flags interval
        elements = {
            127.0.0.0/8,
            10.0.0.0/8,
            172.16.0.0/12,
            192.168.0.0/16
        }
    }

    chain input {
        type filter hook input priority 0; policy drop;

        iif "lo" accept
        ct state established,related accept
        ct state invalid drop
        tcp dport $SSHD_PORT accept
        ip protocol icmp accept
        ip6 nexthdr ipv6-icmp accept
    }

    chain forward {
        type filter hook forward priority 0; policy drop;
    }

    chain output {
        type filter hook output priority 0; policy accept;

        oif "lo" accept
        ct state established,related accept
        meta skuid $TOR_UID accept
        tcp dport $TRANS_PORT accept
        udp dport $DNS_PORT accept
        ip daddr @NON_TOR accept
        ip6 daddr ::1/128 accept
        drop
    }
}

table ip nat {
    set NON_TOR {
        type ipv4_addr
        flags interval
        elements = {
            127.0.0.0/8,
            10.0.0.0/8,
            172.16.0.0/12,
            192.168.0.0/16
        }
    }

    chain prerouting {
        type nat hook prerouting priority -10; policy accept;
    }

    chain output {
        type nat hook output priority -10; policy accept;

        # Redirect DNS to Tor's DNS port first (including 127.0.0.1:53 from
        # systemd resolver / NM / dhclient pointing at loopback).
        udp dport 53 redirect to :$DNS_PORT
        tcp dport 53 redirect to :$TRANS_PORT

        ip daddr $VIRT_ADDR tcp flags syn redirect to :$TRANS_PORT

        meta skuid $TOR_UID return
        oif "lo" return
        ip daddr @NON_TOR return

        tcp flags syn redirect to :$TRANS_PORT
    }
}
user@debian:~$ sudo tee /etc/nftables.conf >/dev/null <<'EOF'
#!/usr/sbin/nft -f
flush ruleset
EOF
user@debian:~$ sudo nft -f /etc/nftables-tor.conf
user@debian:~$ sudo systemctl enable --now nftables
3.2: Boot Ordering
Boot ordering
systemd may start `tor@default` before the firewall finishes loading. Tor's own traffic is UID-exempted, so Tor starts even without the firewall. Thus, a brief window exists where application traffic hits no rules (bypasses firewall). Run the following so that Tor waits for the proxy to go up first:user@debian:~$ sudo mkdir -p /etc/systemd/system/tor@default.service.d
user@debian:~$ cat <<'EOF' | sudo tee /etc/systemd/system/tor@default.service.d/firewall-first.conf
[Unit]
After=tor-transparent-proxy.service
EOF
user@debian:~$ sudo mkdir -p /etc/systemd/system/nftables.service.d
user@debian:~$ cat <<'EOF' | sudo tee /etc/systemd/system/nftables.service.d/early-load.conf
[Unit]
DefaultDependencies=no
Before=network-pre.target
EOF
user@debian:~$ sudo systemctl daemon-reload
3.3: Watchdog
Firewall Watchdog
Root user or package/system updates can overwrite the rules. The watchdog detects missing redirect rules every 10 seconds and reapplies them automatically. It only runs while `tor-transparent-proxy.service` is active, so it never fights a deliberate "disable the proxy" decision. The `quick-systor` script installs it automatically. For manual firewall setups, install it by hand as described below. **Manual install** — write the script, service, and timer:# 1. Watchdog script
user@debian:~$ sudo cat > /usr/local/sbin/tor-wall-watchdog <<'WATCHDOG'
#!/usr/bin/env bash
set -euo pipefail
# Only run while the proxy unit is active.
if ! systemctl is-active --quiet tor-transparent-proxy.service 2>/dev/null; then
exit 0
fi
TAG="tor-wall-watchdog"
log() { systemd-cat -t "$TAG" -p info <<<"$*"; }
warn() { systemd-cat -t "$TAG" -p warning <<<"$*"; }
TOR_CONF="/etc/nftables-tor.conf"
if nft list chain ip nat output 2>/dev/null | grep -q "redirect to"; then
exit 0
fi
warn "Tor redirect rules missing! Reapplying from $TOR_CONF ..."
nft -f "$TOR_CONF" && log "Rules reapplied." || { warn "Reapply FAILED."; exit 1; }
TOR_USER=""
for u in debian-tor tor; do
id -u "$u" >/dev/null 2>&1 && { TOR_USER="$u"; break; }
done
if [ -n "$TOR_USER" ]; then
NON_TOR="$(ps -U "$TOR_USER" -o pid,comm --no-headers 2>/dev/null | grep -vE '[t]or($| )' || true)"
if [ -n "$NON_TOR" ]; then
warn "Non-Tor processes running as UID $TOR_USER (unfiltered internet access!):"
while IFS= read -r line; do
warn " $line"
pid="$(echo "$line" | awk '{print $1}')"
[ -n "$pid" ] && kill "$pid" 2>/dev/null && warn " → Killed PID $pid" || true
done <<<"$NON_TOR"
sleep 2
ps -U "$TOR_USER" -o pid,comm --no-headers 2>/dev/null | grep -vE '[t]or($| )' | awk '{print $1}' | while read -r pid; do
[ -n "$pid" ] && kill -9 "$pid" 2>/dev/null && warn " → SIGKILL PID $pid" || true
done
fi
fi
WATCHDOG
user@debian:~$ sudo chmod +x /usr/local/sbin/tor-wall-watchdog
# 2. systemd service (owned by the proxy unit)
user@debian:~$ sudo cat > /etc/systemd/system/tor-wall-watchdog.service <<'EOF'
[Unit]
Description=Tor firewall rule watchdog
PartOf=tor-transparent-proxy.service
After=network.target
[Service]
Type=oneshot
ExecStart=/usr/local/sbin/tor-wall-watchdog
ProtectSystem=full
ReadWritePaths=/run
NoNewPrivileges=yes
PrivateTmp=yes
EOF
# 3. systemd timer (fires every 10s, catches up after suspend)
user@debian:~$ sudo cat > /etc/systemd/system/tor-wall-watchdog.timer <<'EOF'
[Unit]
Description=Tor firewall rule watchdog timer
PartOf=tor-transparent-proxy.service
[Timer]
OnBootSec=10s
OnUnitActiveSec=10s
Persistent=true
[Install]
WantedBy=tor-transparent-proxy.service
EOF
user@debian:~$ sudo systemctl daemon-reload
# The timer is pulled in by the proxy unit's [Install]. Enabling the proxy
# enables the timer. For manual installs without the proxy unit, run:
# sudo systemctl enable --now tor-wall-watchdog.timer
3.4: Immutable Firewall
Immutable Firewall
`chattr +i` makes the configuration file immutable (even root cannot modify or delete it without first removing the flag). This prevents: - Accidental edits (`apt upgrade`, etc.) - Malicious tampering by processes with root privilege - Unintended `> /etc/nftables.conf` shell redirectsuser@debian:~$ sudo chattr +i /etc/nftables-tor.conf /etc/nftables.conf /etc/nftables-stop.conf
user@debian:~$ sudo chattr -i /etc/nftables-tor.conf   # unlock
user@debian:~$ sudo nano /etc/nftables-tor.conf        # edit
user@debian:~$ sudo nft -f /etc/nftables-tor.conf      # apply
user@debian:~$ sudo chattr +i /etc/nftables-tor.conf   # re-lock ! IMPORTANT !
3.5: UID Isolation
Tor UID isolation
The firewall exempts traffic from the Tor UID (`debian-tor`, UID ~110) from all redirection and filtering. This is necessary for Tor to reach the internet. *Any process running as this UID gets unfiltered internet access.* Check for non-Tor processes:# Debian
user@debian:~$ sudo ps -U debian-tor -o pid,comm
# Arch
user@archlinux:~\$ sudo ps -U tor -o pid,comm
3.6: Blocking IPv6
Blocking IPv6
The `inet filter` table drops all IPv6 application traffic except localhost and established/related connections. IPv6 cannot leak because packets never leave the machine. Tor itself can still use IPv6 to reach guards (`skuid` exemption), and IPv6 loopback works. Application-level IPv6 is intentionally blocked. Routing IPv6 through Tor would require Tor to support IPv6 OnionProxy (not stable, and out of scope) and a `table ip6 nat` mirror. Until Tor upstream stabilizes this, dropping IPv6 at the filter is the safest approach. If your ISP provides native IPv6, applications will fail over to IPv4 after IPv6 attempts are dropped. This is a small performance penalty at connection establishment but has no leak.3.7: Raw sockets
Raw sockets & eBPF
**Raw sockets** (`CAP_NET_RAW`): processes with this capability can craft arbitrary packets that bypass netfilter hooks. `ping` and `traceroute` are the most common users. The filter output chain drops ICMP anyway, so ping is blocked. Remove `CAP_NET_RAW` from binaries that do not need it. **eBPF programs**: unprivileged eBPF can bypass netfilter by attaching programs to sockets that operate below the filter layer. Disable unprivileged BPF:user@debian:~$ sudo sysctl kernel.unprivileged_bpf_disabled=1
user@debian:~$ echo "kernel.unprivileged_bpf_disabled = 1" | sudo tee /etc/sysctl.d/90-bpf-hardening.conf
3.8: Package Updates
Package updates
Debian's `apt upgrade` treats `/etc/tor/torrc` and `/etc/nftables.conf` as config files. If the package ships a new default, dpkg will prompt something like this:Configuration file '/etc/nftables.conf'
==> Modified (by you or by a script). What would you like to do about it?
Y or I : install the package maintainer's version
N or O : keep your currently-installed version
D : show differences
3.9: Confirm gate
Confirm gate for proxy disable
`systemctl disable --now tor-transparent-proxy.service` runs the 10 second wall-broadcast confirmation window. If you confirm with `sudo tor-firewall-confirm`, the firewall rules are flushed (unproxied clearnet). If you don't confirm, the lockdown mode (`/etc/nftables-stop.conf`) is loaded (all internet blocked). Recover by re-enabling the proxy or by rebooting (reboot loads clearnet because the proxy is disabled). #### How Confirm gate workssudo systemctl disable --now tor-transparent-proxy.service
→ broadcast to every logged-in session (wall, loginctl, pts, notify-send)
→ 10 seconds
→ no confirmation → lockdown loaded, internet dead
→ confirmed (sudo tor-firewall-confirm) → rules flushed, internet open
→ disable removes the boot symlink → reboot stays clearnet
user@debian:~$ sudo cat > /usr/local/sbin/tor-firewall-gate <<'GATE'
#!/usr/bin/env bash
set +eu
BACKEND="${1:-}"
FLAG="/run/tor-firewall-stop-ok"
RESULT=""

BIN_WALL="";     command -v wall        >/dev/null 2>&1 && BIN_WALL="$(command -v wall)"
BIN_LCTL="";     command -v loginctl    >/dev/null 2>&1 && BIN_LCTL="$(command -v loginctl)"
BIN_CAT="";      command -v systemd-cat >/dev/null 2>&1 && BIN_CAT="$(command -v systemd-cat)"
BIN_NS="";       command -v notify-send >/dev/null 2>&1 && BIN_NS="$(command -v notify-send)"
BIN_RUNUSER="";  command -v runuser    >/dev/null 2>&1 && BIN_RUNUSER="$(command -v runuser)"

broadcast() {
    local msg="$1" sid uid usr tty disp d
    [ -n "$BIN_WALL" ] && "$BIN_WALL" -n "$msg" 2>/dev/null || true
    if [ -n "$BIN_LCTL" ]; then
        "$BIN_LCTL" list-sessions --no-legend 2>/dev/null | while read -r sid uid usr _junk; do
            [ -n "$sid" ] || continue
            tty="$("$BIN_LCTL" show-session "$sid" -p TTY --value 2>/dev/null)"
            if [ -n "$tty" ] && [ -e "/dev/$tty" ]; then
                printf '\r\n%s\r\n' "[tor-firewall] $msg" >"/dev/$tty" 2>/dev/null || true
            fi
            disp="$("$BIN_LCTL" show-session "$sid" -p Display --value 2>/dev/null)"
            if [ -n "$BIN_NS" ] && [ -n "$BIN_RUNUSER" ] && [ -n "$disp" ] && [ -n "$usr" ] && [ -n "$uid" ]; then
                "$BIN_RUNUSER" -u "$usr" -- \
                    env DBUS_SESSION_BUS_ADDRESS="unix:path=/run/user/$uid/bus" \
                    "$BIN_NS" -u critical -i dialog-warning "tor-firewall-gate" "$msg" 2>/dev/null || true
            fi
        done || true
    fi
    for d in /dev/pts/[0-9]* /dev/tty[0-9]* /dev/console; do
        [ -e "$d" ] && [ -w "$d" ] && printf '\r\n%s\r\n' "[tor-firewall] $msg" >"$d" 2>/dev/null || true
    done
    [ -n "$BIN_CAT" ] && printf '%s\n' "$msg" | "$BIN_CAT" -t tor-firewall-gate -p warning 2>/dev/null || true
}

finalize() { broadcast "$RESULT"; }
trap finalize EXIT
trap 'RESULT+=" (Interrupted by signal. User may need to take manual action.)"; exit 130' TERM INT HUP QUIT

if [ -f /run/tor-gate-first-start ]; then
    rm -f /run/tor-gate-first-start
    RESULT="First start — confirm-gate skipped this once."
    exit 0
fi

if systemctl list-jobs 2>/dev/null | grep -qE '(shutdown|reboot|halt|poweroff|kexec)\.target'; then
    RESULT="Shutdown in progress — confirm-gate surrendering; init preserves state."
    exit 0
fi

broadcast "Firewall stop requested. Run 'sudo tor-firewall-confirm' within 10 seconds or internet will be blocked."
RESULT="Firewall stop requested — no confirmation received within 10 seconds."
rm -f "$FLAG"
sleep 10

if [ -f "$FLAG" ]; then
    rm -f "$FLAG"
    nft flush ruleset; rc=$?
    if [ "$rc" -eq 0 ]; then
        RESULT="Firewall stopped. Internet is open (nft flush rc=$rc)."
    else
        RESULT="Firewall flush FAILED rc=$rc. State unknown. Run 'nft list ruleset'. MANUAL ACTION NEEDED."
    fi
else
    rc_apply=0
    if [ -f /etc/nftables-stop.conf ]; then
        nft -f /etc/nftables-stop.conf || rc_apply=$?
    else
        rc_apply=99
    fi
    case "$rc_apply" in
        0)  RESULT="Firewall stop BLOCKED (no confirmation). Lockdown mode activated. Internet is cut. Re-enable the proxy ('systemctl enable --now tor-transparent-proxy.service') or reboot to recover. If you did not run this, it may be an attack attempt. Proceed with caution." ;;
        99) RESULT="Firewall stop BLOCKED AND lockdown mode config MISSING. Check /etc/nftables-stop.conf. Re-enable the proxy or reboot immediately. MANUAL ACTION NEEDED." ;;
        *)  RESULT="Firewall stop BLOCKED but lockdown mode ruleset FAILED (rc=$rc_apply). Check /etc/nftables-stop.conf. Re-enable the proxy or reboot immediately. MANUAL ACTION NEEDED." ;;
    esac
fi
exit 0
GATE
user@debian:~$ sudo chmod +x /usr/local/sbin/tor-firewall-gate
user@debian:~$ sudo cat > /usr/local/bin/tor-firewall-confirm <<'CONFIRM'
#!/usr/bin/env bash
if [ "$(id -u)" -ne 0 ]; then
    echo "Run with sudo: sudo tor-firewall-confirm"
    exit 1
fi
date +%s > /run/tor-firewall-stop-ok
chmod 600 /run/tor-firewall-stop-ok
echo "Firewall stop confirmed. Rules will flush within 10 seconds."
CONFIRM
user@debian:~$ sudo chmod +x /usr/local/bin/tor-firewall-confirm
user@debian:~$ sudo cat > /etc/nftables-stop.conf <<EOF
#!/usr/sbin/nft -f
flush ruleset
table inet filter {
    chain input {
        type filter hook input priority 0; policy drop;
        iif "lo" accept
        ct state established,related accept
        ct state invalid drop
        tcp dport 22 accept
        ip protocol icmp accept
        ip6 nexthdr ipv6-icmp accept
    }
    chain forward {
        type filter hook forward priority 0; policy drop;
    }
    chain output {
        type filter hook output priority 0; policy drop;
        oif "lo" accept
        ct state established,related accept
    }
}
EOF
user@debian:~$ sudo chattr +i /etc/nftables-stop.conf
user@debian:~$ sudo cat > /usr/local/sbin/tor-transparent-proxy <<'EOF'
#!/usr/bin/env bash
set -euo pipefail
TOR_CONF="/etc/nftables-tor.conf"
WATCHDOG_TIMER="tor-wall-watchdog.timer"
case "${1:-status}" in
    start)   nft -f "$TOR_CONF"; systemctl start "$WATCHDOG_TIMER" 2>/dev/null || true ;;
    stop)    exec /usr/local/sbin/tor-firewall-gate nftables ;;
    status)  systemctl is-active --quiet tor-transparent-proxy.service && echo active || echo inactive ;;
esac
EOF
user@debian:~$ sudo chmod +x /usr/local/sbin/tor-transparent-proxy

user@debian:~$ sudo cat > /etc/systemd/system/tor-transparent-proxy.service <<'EOF'
[Unit]
Description=Transparent Tor proxy (nftables redirect)
Wants=tor@default.service
After=nftables.service

[Service]
Type=oneshot
RemainAfterExit=yes
ExecStart=/usr/local/sbin/tor-transparent-proxy start
ExecStop=/usr/local/sbin/tor-transparent-proxy stop
ExecStopPost=/usr/bin/systemctl stop tor-wall-watchdog.timer

[Install]
WantedBy=multi-user.target
EOF
user@debian:~$ sudo systemctl daemon-reload
user@debian:~$ sudo systemctl enable --now tor-transparent-proxy.service
user@debian:~$ sudo systemctl enable --now tor-transparent-proxy.service # reloads Tor redirect rules
3.10: Verify Hardening
Verify Hardening
Confirm the proxy unit and watchdog are running:user@debian:~$ systemctl is-active tor-transparent-proxy.service # active
user@debian:~$ systemctl is-active tor-wall-watchdog.timer # active (only while proxy is on)
user@debian:~$ journalctl -t tor-wall-watchdog
user@debian:~$ systemctl cat tor@default.service | grep -A2 firewall-first || \
>   systemctl cat tor.service | grep -A2 firewall-first
user@debian:~$ lsattr /etc/nftables-tor.conf /etc/nftables.conf /etc/nftables-stop.conf
# Each should show: ----i---------e------- ...
user@debian:~$ sudo nft flush ruleset
user@debian:~$ sleep 15
user@debian:~$ sudo nft list chain ip nat output | grep "redirect to"
# Rules should reappear (watchdog reapplies /etc/nftables-tor.conf)
user@debian:~$ journalctl -t tor-wall-watchdog --since "1 min ago"
user@debian:~$ systemctl cat tor-transparent-proxy.service | grep ExecStop
# Should show ExecStop=/usr/local/sbin/tor-transparent-proxy stop

user@debian:~$ lsattr /etc/nftables-stop.conf
# Should show: ----i---------e------- /etc/nftables-stop.conf

user@debian:~$ sudo tor-firewall-confirm
# Should print an error asking for sudo (expected)
user@debian:~$ sudo systemctl disable --now tor-transparent-proxy.service
# Wait. Don't confirm.
user@debian:~$ journalctl -t tor-firewall-gate
# After 10s the lockdown loads. Recover:
user@debian:~$ sudo systemctl enable --now tor-transparent-proxy.service
Step 4: Verification
Test that traffic is being routed through Tor transparently:
user@debian:~$ curl https://check.torproject.org/api/ip
Note that there's no --socks5 flag. This request goes through the transparent proxy.
It should return a Tor exit node IP alongside the IsTor field being true.
Confirm ping (icmp) is blocked:
user@debian:~$ ping 8.8.8.8
This will hang until timeout. The output chain silently drops ping packets. No "Operation not permitted" error, no ICMP unreachable, just 100% packet loss (confirm by pressing Ctrl+c). Open Firefox (or any regular browser) and navigate to:
https://check.torproject.org/
It should display: "Congratulations. This browser is configured to use Tor."
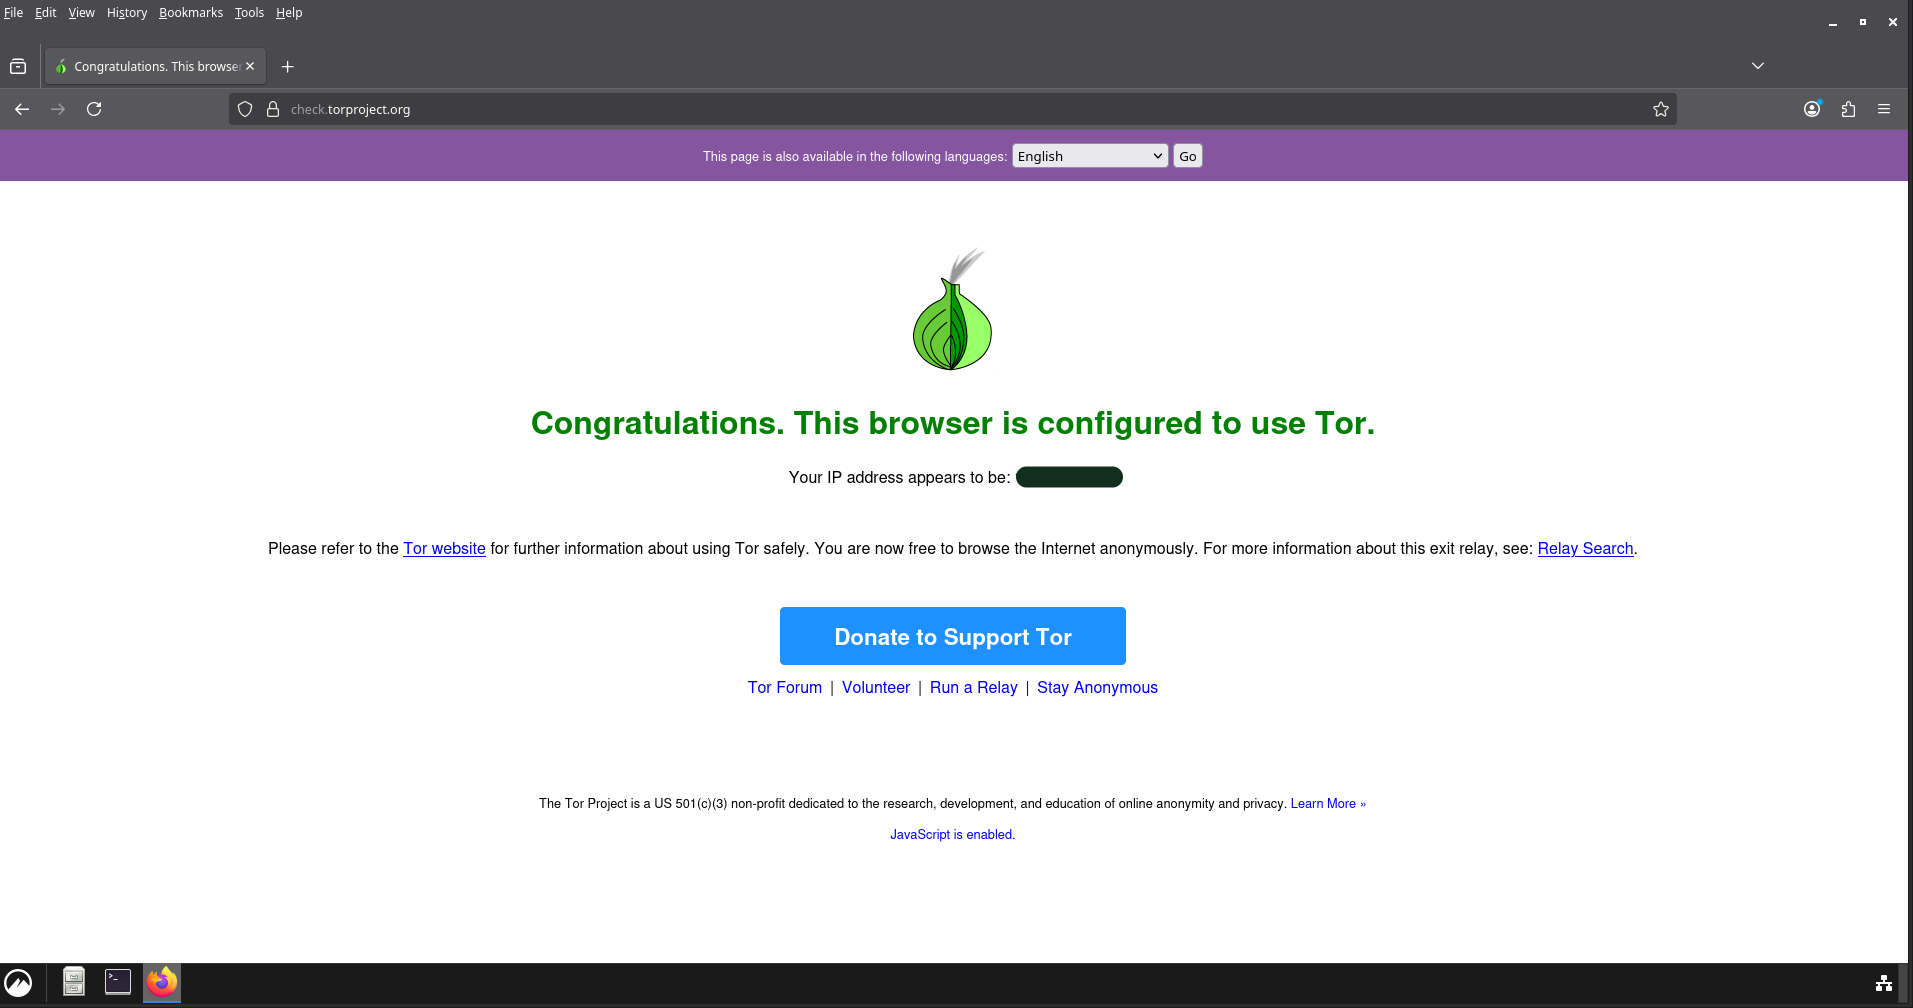
If it does not, refer to Troubleshooting.
Step 5: Install and Use Tor Browser
The Tor Browser bundles its own internal Tor service as usual. With a transparent proxy though, that traffic gets forced through the system Tor, creating a Tor-over-Tor connection. Tor-over-Tor adds unnecessary latency and circuit nesting. This also puts a lot of load on the network. Do NOT leave it this way.
We need to make Tor Browser use the system Tor service instead.
Install Tor Browser from tarball
Download the latest Linux tarball from torproject.org/download/
and extract to ~/.local/share/tor-browser/:
user@debian:~$ mkdir -p ~/.local/share/tor-browser
user@debian:~$ curl -L https://www.torproject.org/dist/torbrowser/15.0.19/tor-browser-linux-x86_64-15.0.19.tar.xz \
  | tar -xJ -C ~/.local/share/tor-browser --strip-components=1
The script (
quick-systor.sh) automatically gets the latest version from the download page and extracts it to~/.local/share/tor-browser/.
Now add a second SocksPort to your system /etc/tor/torrc, so Tor Browser has
a SOCKS endpoint to use. Tor Browser's bundled Tor listens on 9150 when it
runs standalone, and pointing it at the system Tor on the same port
preserves all its default preferences.
Edit /etc/tor/torrc and add:
SocksPort 127.0.0.1:9150
Then restart Tor:
user@debian:~$ sudo systemctl restart tor@default
Launch Tor Browser using the system Tor
Tell Tor Browser to use the system Tor instead of its bundled one:
user@debian:~$ ~/.local/share/tor-browser/Browser/start-tor-browser --detach
Or create a desktop entry at ~/.local/share/applications/tor-browser.desktop:
[Desktop Entry]
Type=Application
Name=Tor Browser
GenericName=Web Browser
Comment=Tor Browser is +1 for privacy and -1 for mass surveillance
Categories=Network;WebBrowser;Security;
Exec=/home/user/.local/share/tor-browser/Browser/start-tor-browser %u
Icon=tor-browser
Terminal=false
StartupNotify=true
MimeType=text/html;text/plain;application/xhtml+xml;application/xml;application/rss+xml;application/rdf+xml;image/gif;image/jpeg;image/png;x-scheme-handler/http;x-scheme-handler/https;
Shell alias for terminal launch:
user@debian:~$ echo 'alias tor-browser="$HOME/.local/share/tor-browser/Browser/start-tor-browser"' >> ~/.bashrc
user@debian:~$ source ~/.bashrc
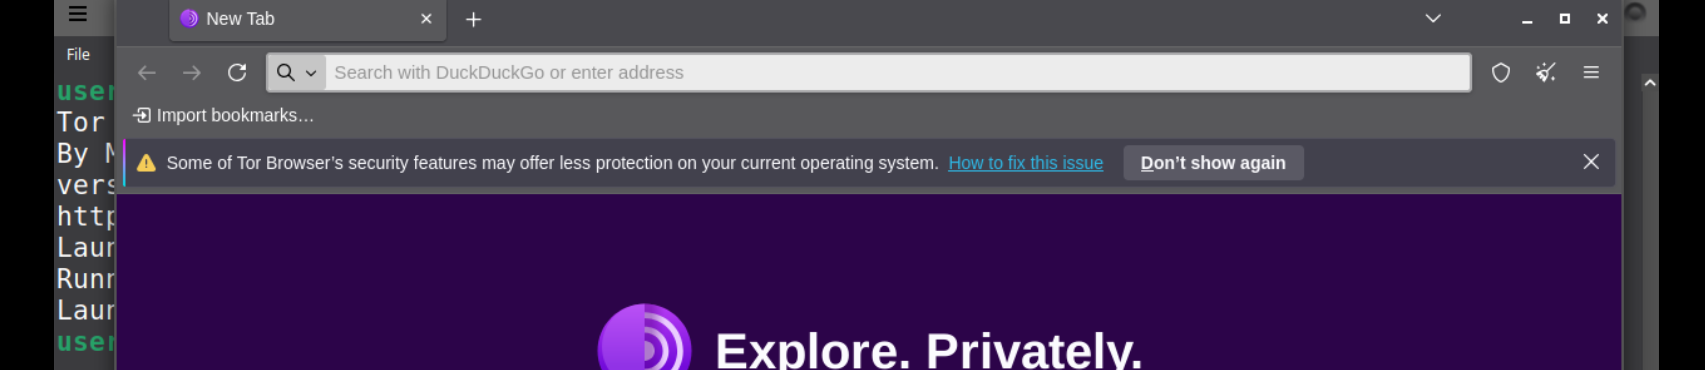
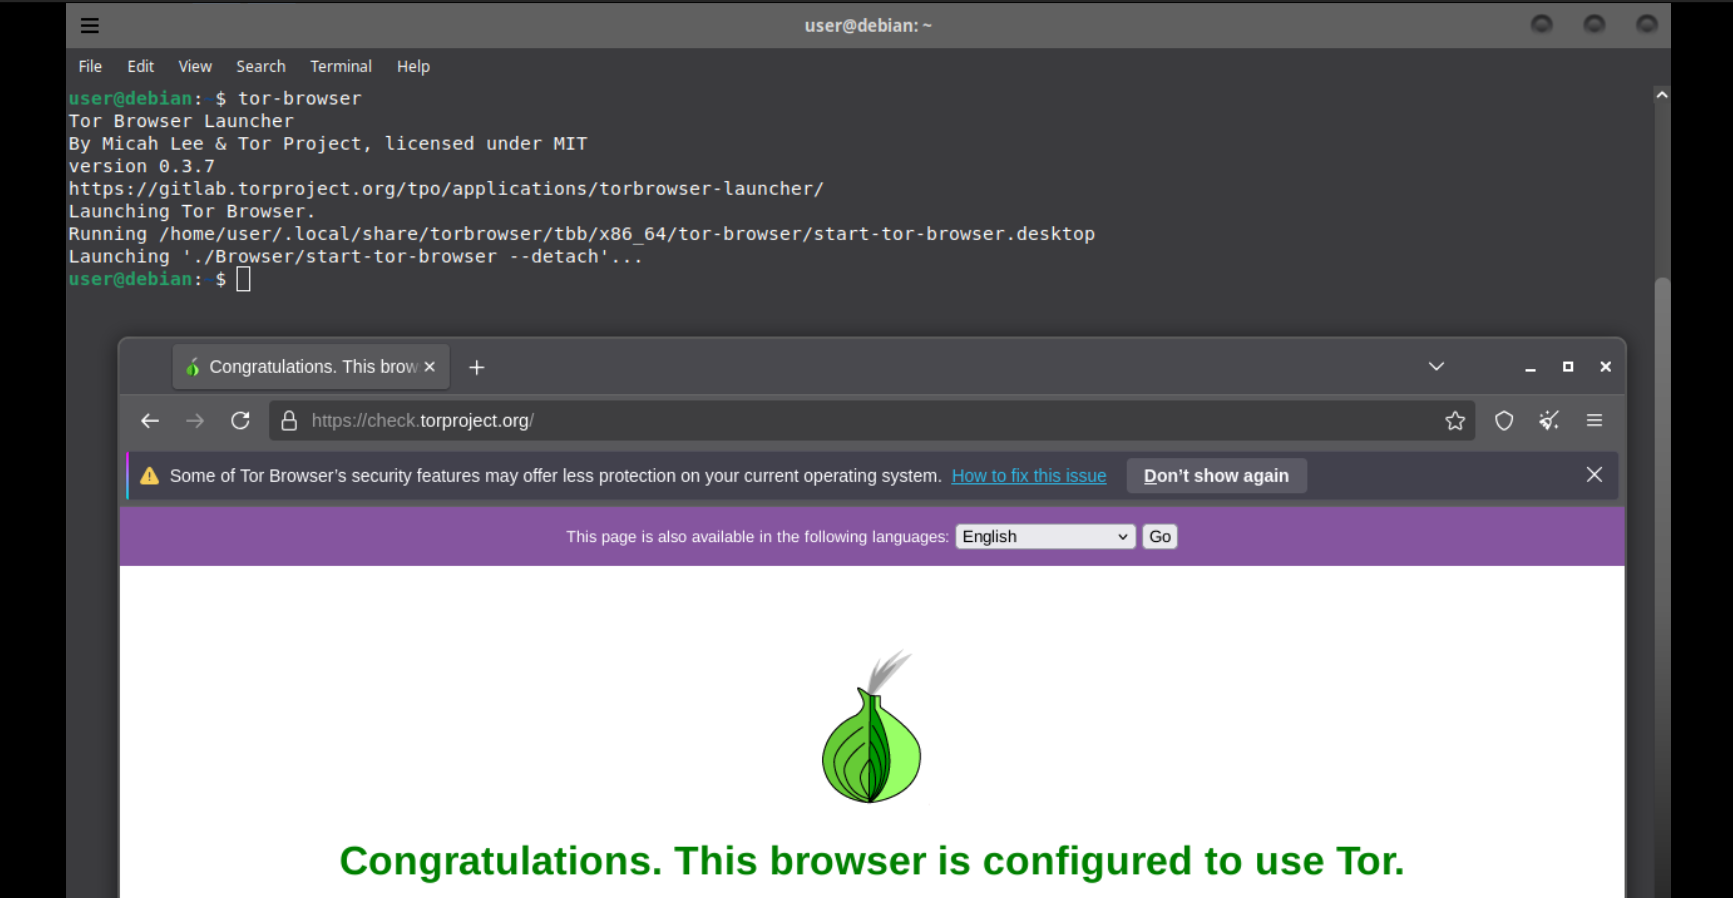
When Tor Browser first launches you may see a banner warning that "some of Tor Browser's security features may offer less protection on your current operating system." This is normal, and you can dismiss it with "Don't show again" (Unless you've made other changes to your system, in which case you should be careful):
Point Tor Browser at the system SocksPort (if it still asks you to connect)
If launching Tor browser still gives you an option to 'Connect' or 'Configure connection':
1. Open Settings → Connection (or type about:preferences#connection).
2. Click Settings... under "Configure how Tor Browser connects to the Internet".
3. Select "I use a proxy to connect to the internet".
4. Protocol: SOCKS5, Host: 127.0.0.1, Port: 9150.
5. Tick "Proxy SOCKS5 DNS" if present, OK.
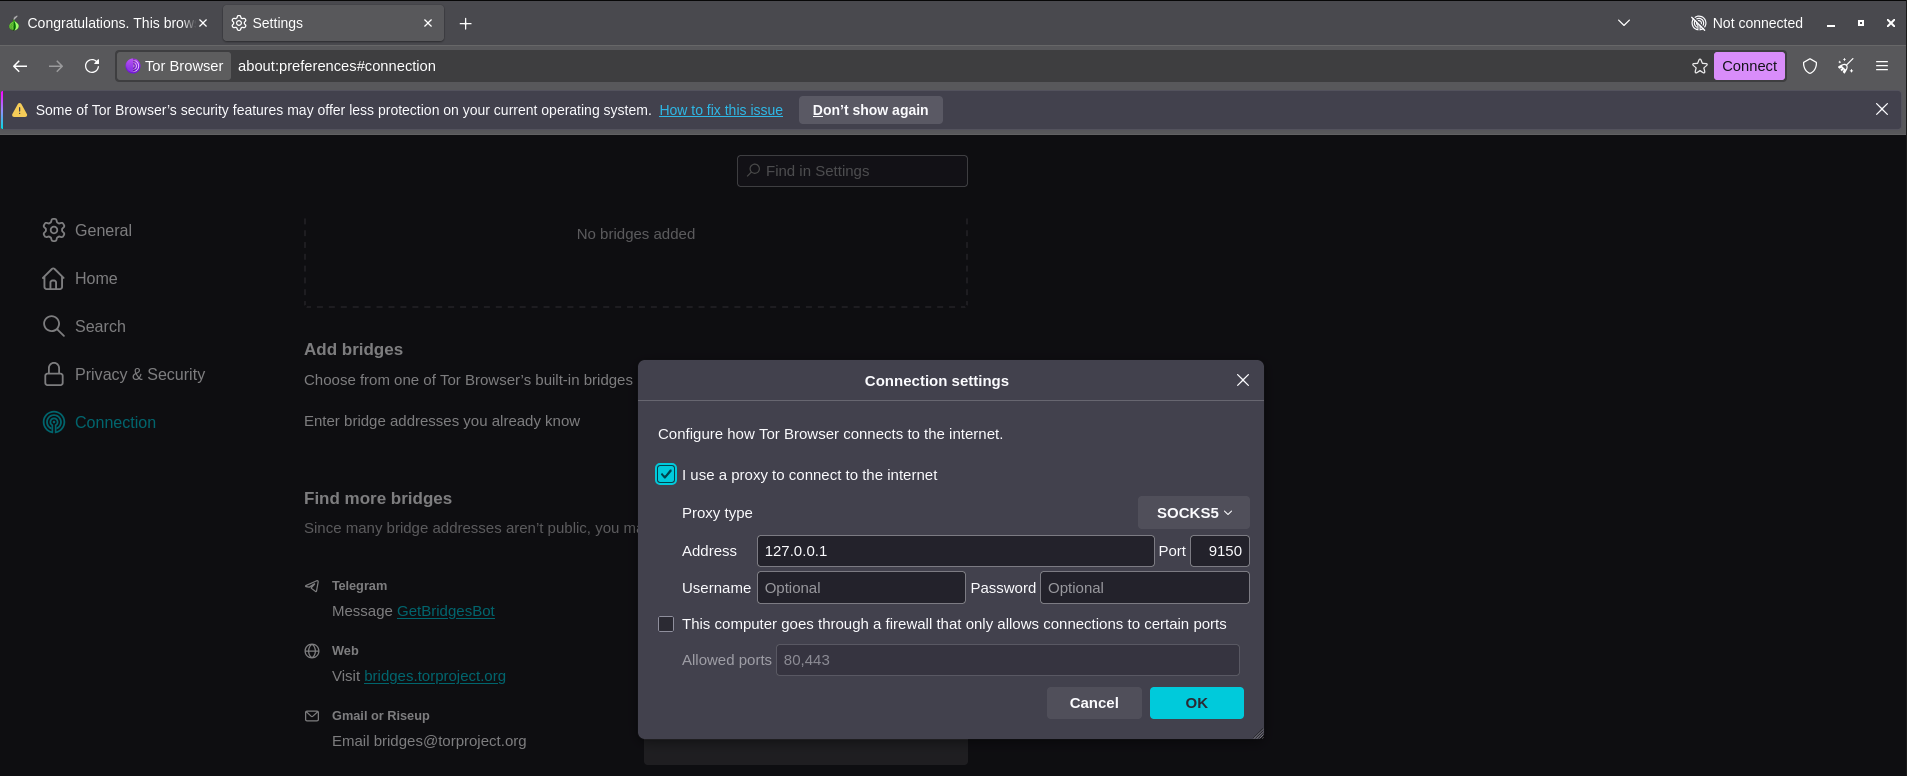
After this, you can safely ignore the "Connect to Tor" warning and continue browsing from the Tor browser.
To verify, open https://check.torproject.org/ inside Tor Browser.
It should confirm you are using Tor.
Hosting a Hidden Service
A hidden service lets other people reach a server you run (website, SSH, xmpp, etc.) without them knowing your real IP. Tor back-connects from a random point into your machine over the Tor network.
Plan the hidden service
Decide: - What local port to expose (e.g. 80 for a website, 22 for SSH). - The hidden service port you want visitors to use externally. It's usually the same number, but it doesn't have to be.
For this tutorial we'll expose a local HTTP server on port 80 as a hidden service on the same port 80.
Add the hidden service lines to torrc
Edit /etc/tor/torrc and ensure the following block is present (if you
copied it from Step 2 already, just confirm):
HiddenServiceDir /var/lib/tor/hidden_service/
HiddenServicePort 80 127.0.0.1:80
What each line does:
- HiddenServiceDir: Directory where Tor stores the service's private keys
and hostname file. Exposing this folder leaks your service's identity forever.
If you lose these keys, the .onion address is lost permanently.
Back up this directory.
- HiddenServicePort: Maps the external onion port (first 80) to a local
host:port (127.0.0.1:80). Tor accepts incoming Tor circuits on this
port and forwards them locally as plain TCP. The transparent firewall
doesn't interfere because the localhost listener counts as established.
Add more HiddenServicePort lines to expose more services on the same
onion address:
HiddenServicePort 22 127.0.0.1:22
HiddenServicePort 8080 127.0.0.1:8080
Keep one HiddenServiceDir per logical service identity (separate services get
separate directories).
Create the directory and fix permissions
Tor needs to own the hidden service directory, otherwise it will refuse to start.
user@debian:~$ sudo mkdir -p /var/lib/tor/hidden_service
user@debian:~$ sudo chown debian-tor:debian-tor /var/lib/tor/hidden_service
user@debian:~$ sudo chmod 700 /var/lib/tor/hidden_service
On Arch the user/group is tor and not debian-tor:
user@archlinux:~\$ sudo chown tor:tor /var/lib/tor/hidden_service
Restart Tor and read your onion address
user@debian:~$ sudo systemctl restart tor@default
user@debian:~$ sudo cat /var/lib/tor/hidden_service/hostname
The hostname file contains a 56-character v3 onion address like abcd1234...56.onion.
This is what you share with visitors. Anyone who knows it can reach your service
through the Tor network.
If the file is empty or missing, check Tor's logs:
user@debian:~$ sudo journalctl -u tor@default --no-pager -n 50 | grep -i hidden
Run the local server
Launch whatever you want to expose on 127.0.0.1:<port>. For HTTP:
# Example: serve a static folder
user@debian:~$ python3 -m http.server 80 --bind 127.0.0.1
user@debian:~/site$ sudo cat /var/lib/tor/my_hidden_service/hostname
bitll5cx4bstvfpmgvxm6dkd2rbbnv2twjiyktqly3nvkzgysxjs6wqd.onion
user@debian:~/site$ cat index.html
Hello
user@debian:~/site$ sudo python3 -m http.server 80 --bind 127.0.0.1
Serving HTTP on 127.0.0.1 port 80 (http://127.0.0.1:80/) ...
127.0.0.1 - - [23/Jul/2026 06:38:12] "GET / HTTP/1.1" 200 -
127.0.0.1 - - [23/Jul/2026 06:38:14] code 404, message File not found
127.0.0.1 - - [23/Jul/2026 06:38:14] "GET /favicon.ico HTTP/1.1" 404 -
Only bind to 127.0.0.1. If you bind to 0.0.0.0 or your LAN IP your service
is also reachable from the local network directly. Binding to 0.0.0.0 or your LAN IP defeats the purpose of the hidden service.
Test from another Tor client
Open the onion address in Tor Browser (yours, or anyone else's) or curl:
user@debian:~$ torsocks curl http://<your-onion-address>.onion/

You should see your local server's reply. If it times out:
- Confirm Tor is running: sudo systemctl status tor@default
- Confirm the local server is listening on 127.0.0.1:80:
ss -lnp | grep ':80 '
- Confirm the hostname file matches the address you tested.
- Wait. First-time hidden service descriptors can take 2–5 minutes to publish.
Notes on OPSEC
- The hidden service hostname is a public identifier. Anyone who has it can attempt to connect. Onion services authenticate by knowing the address (no separate password unless you add OnionAuth (out of scope)).
- If multiple people connect, your server logs show nothing about their IPs. This is expected.
- Your real IP cannot leak through the onion service. But your server logs (user agents, paths, form data) may identify you. Treat logs as sensitive.
- Keep the
HiddenServiceDirprivate. Anyone with those keys can impersonate your service. Back up offsite, encrypt, restrict perms.
Troubleshooting
Tor UID mismatch
Run id -u debian-tor. If the output is not 110, update TOR_UID in
/etc/nftables-tor.conf and re-apply (re-enabling the proxy unit reloads it):
user@debian:~$ sudo systemctl restart tor-transparent-proxy.service
On Arch the user is tor, not debian-tor. Use id -u tor instead. The helper
scripts auto-detect this; the manual config requires you to hardcode it.
Wrong network interface The firewall rules operate on the OUTPUT hook (not per-interface), so switching between Ethernet and Wi-Fi won't break the proxy. If the helper scripts refused to run because no default route was present, connect to a network and retry.
DNS not resolving Check that Tor's DNSPort is listening:
user@debian:~$ ss -lnp | grep 5353
If nothing shows, check sudo journalctl -u tor@default for errors. It might be
a typo in /etc/tor/torrc.
Traffic leaks (check.torproject.org shows real IP) Verify the NAT redirect rule is active:
user@debian:~$ sudo nft list ruleset | grep -A2 "udp dport 53"
If nothing shows, the proxy unit is inactive or the watchdog hasn't caught up yet. Recover:
user@debian:~$ sudo systemctl enable --now tor-transparent-proxy.service
SSH lockout after applying firewall
The input chain only allows $SSHD_PORT (default 22). If you use a non-standard
SSH port, set define SSHD_PORT = YOUR_PORT in /etc/nftables-tor.conf, then re-enable the proxy.
Tor won't start
user@debian:~$ journalctl -u tor@default --no-pager -n 50
Look for [warn] or [err] messages. The problem is usually a missing colon
or space in torrc. Run sudo -u debian-tor tor --verify-config to check syntax
(as the debian-tor user to avoid hidden service ownership warnings).
Errors if you've run an older version of the script
The current scripts auto-migrate the old configuration (they unlock immutable files,
move /etc/nftables.conf → /etc/nftables-tor.conf if it held Tor rules, and
remove the old stop-gate.conf dropin). Just re-run the script. If it still
fails to overwrite, unlock manually and retry:
user@debian:~$ sudo chattr -i /etc/nftables-tor.conf /etc/nftables.conf /etc/nftables-stop.conf
user@debian:~$ sudo systemctl disable --now tor-transparent-proxy.service 2>/dev/null || true
user@debian:~$ sudo rm -f /etc/systemd/system/nftables.service.d/stop-gate.conf
user@debian:~$ sudo rm -f /etc/systemd/system/netfilter-persistent.service.d/stop-gate.conf
user@debian:~$ sudo rm -f /etc/systemd/system/netfilter-persistent.service.d/early-load.conf
user@debian:~$ sudo systemctl daemon-reload
Then re-run quick-systor.sh. On Arch replace tor@default
with tor.
Forgot to enable at boot If after a reboot nothing is proxied (you're on clearnet even though you wanted Tor), the proxy unit isn't enabled:
user@debian:~$ sudo systemctl enable --now tor-transparent-proxy.service
disable --now (not just stop):
user@debian:~$ sudo systemctl disable --now tor-transparent-proxy.service
Quick Script
Instead of working through every step by hand, you can use
scripts/quick-systor.sh from this repo. It auto-detects
your distro, init system, Tor user, network interface, and SSH port. It then guides
you through an interactive wizard (or runs fully automatic with --yes
which is NOT RECOMMENDED unless you know what you're doing) and installs the
tor-transparent-proxy.service unit that owns the whole proxy.
The script auto-installs missing dependencies: - nftables (if not present) - Tor daemon from the official Tor Project apt repository (or distro repo on Arch/Fedora) - Tor Browser (optional, downloaded as tarball from torproject.org)
Tor is automatically started and bootstrapped if not already running.
Fetch the script through Tor and run it:
# systemd systems (Debian, Arch)
user@debian:~$ curl --socks5 127.0.0.1:9050 -fsSL \
>   http://opbible7nans45sg33cbyeiwqmlp5fu7lklu6jd6f3mivrjeqadco5yd.onion/opsec/proxying-linux-through-tor/scripts/quick-systor.sh \
>   -o quick-systor.sh
user@debian:~$ sudo bash quick-systor.sh

# OpenRC systems (Devuan, Artix)
user@debian:~$ curl --socks5 127.0.0.1:9050 -fsSL \
>   http://opbible7nans45sg33cbyeiwqmlp5fu7lklu6jd6f3mivrjeqadco5yd.onion/opsec/proxying-linux-through-tor/scripts/quick-systor-openrc.sh \
>   -o quick-systor-openrc.sh
user@debian:~$ sudo bash quick-systor-openrc.sh
The wizard walks you through each decision:
1. Configure /etc/tor/torrc
2. Optionally host a hidden service
3. Choose home/trusted or hostile/public network mode
4. Optionally integrate Tor Browser with the system Tor service
After confirmation, it backs up existing configs, applies all changes, installs the proxy unit + gate + watchdog, locks the configs immutable, verifies the transparent proxy is working, and prints restore instructions.
Once installed, toggle the proxy anytime (Tor service keeps running):
user@debian:~$ sudo systemctl disable --now tor-transparent-proxy.service   # -> clearnet (10s confirm gate)
user@debian:~$ sudo systemctl enable  --now tor-transparent-proxy.service   # -> Tor
Quick flags
Skip the wizard entirely. Accept all defaults:
user@debian:~$ sudo bash quick-systor.sh --yes # NOT RECOMMENDED UNLESS YOU KNOW WHAT YOU'RE DOING
| Flag | |
|---|---|
--yes |
Accept all defaults, no prompts |
--hostile |
Strip LAN/private-IP exemptions |
--tor-browser |
Include Tor Browser desktop integration (default with --yes) |
--hidden-service PORT:HOST:PORT |
Add a hidden service (repeatable). Short form PORT:PORT expands to PORT:127.0.0.1:PORT |
--dry-run |
Detect everything and print summary, exit |
--undo |
Undo the transparent system proxy setup. Remove the system proxy. |
Useful combinations:
# Full auto, hostile network, with Tor browser
user@debian:~$ sudo bash quick-systor.sh --yes --hostile --tor-browser

# Preview what would happen without changing anything
user@debian:~$ sudo bash quick-systor.sh --dry-run

# Auto mode + expose a web server as a hidden service
# The hidden service is in the form "external_port:internethost:internal_port"
user@debian:~$ sudo bash quick-systor.sh --yes --hidden-service 80:127.0.0.1:80

# Undo all the tor transparent proxying and bring system back to unproxied state
user@debian:~$ sudo bash quick-systor.sh --undo
You follow either the full manual guide above, or run quick-systor.sh. (nftables is the only supported backend.)
Undoing all tor transparent proxying
user@debian:~$ sudo bash quick-systor.sh --undo # Will ask for confirmation

user@debian:~$ sudo bash quick-systor.sh --undo --confirm # Confirm undoing
 Suggest changes
 pocksuppet0
 2026-07-23
 Donate XMR to the author:
82zZT5iKCsj9SMZM7gStTo2a65krBqxxKXQmQP43X5TBehqEKW21RYmZUyptCMDZ5bBbh5gzqEb4YVhQ9oyc21Yx3rwKZQP